눈에 띄게 달라진건 없고 적당히 입력 연출용 UI를 추가했읍니다.
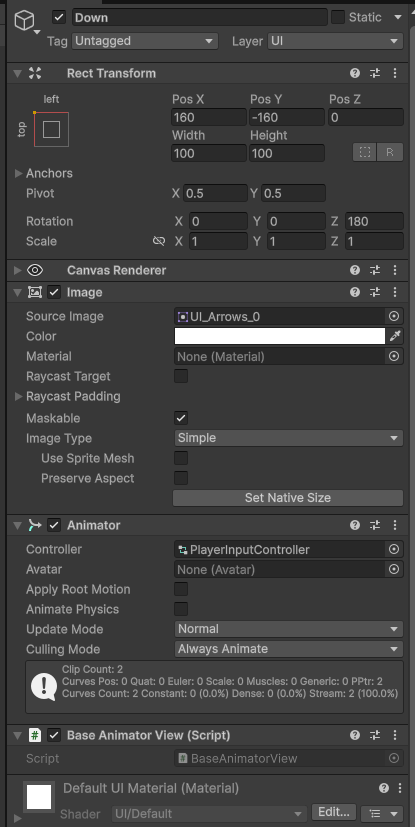
적당히 Animator로 플레이어 입력에 따라 Bool 값을 변경하도록 했습니다.
BaseAnimatorView는 아래 IAnimatorView를 그대로 구현하는 클래스입니다.
생각해보니까 지금까지 View라고 붙여야 할 것들을 죄다 Controller라고 이름붙였더라구요.
  public interface IAnimatorView
  {
    public void SetBool(int hashID, bool value);

    public void SetFloat(int hashID, float value);

    public void SetInt(int hashID, int value);

    public void SetTrigger(int hashID);

    public void Play(int hashID);
  }
[RequireComponent(typeof(Animator))]
public class BaseAnimatorView : MonoBehaviour, IAnimatorView
{
private Animator animator;
private void OnEnable()
{
animator = GetComponent<Animator>();
}
public void Play(int hashID)
=> animator.Play(hashID);
public void SetBool(int hashID, bool value)
=> animator.SetBool(hashID, value);
public void SetFloat(int hashID, float value)
=> animator.SetFloat(hashID, value);
public void SetInt(int hashID, int value)
=> animator.SetInteger(hashID, value);
public void SetTrigger(int hashID)
=> animator.SetTrigger(hashID);
}더도말고 덜도말고 인터페이스 하나만 사용할 View는 해당 IView만 구현해놓은 BaseView를 사용하도록 할 예정입니다.
  public class UIPlayerInputViewContainer : MonoBehaviour
  {
    public BaseAnimatorView upView;
    public BaseAnimatorView downView;
    public BaseAnimatorView leftView;
    public BaseAnimatorView rightView;
  }
그리하여 굳이 UIPlayerInputAnimatorView를 구현할 필요 없이 적당한 BaseAnimatorView를 가져다 쓰게 하니 훨씬 편해졌습니다.

종류별로 BaseView를 만들어뒀습니다.
언젠가 여러 종류 컴포넌트를 복합적으로 사용해야 할 경우가 생기겠지만 그건 그때 가서 새로 클래스를 만들면 될 일이지요.
  public class UIPlayerInputPresenter : IUIPresenter
  {
    public class Model
    {

    }

    private readonly Model model;
    private readonly UIPlayerInputViewContainer leftViewContainer;
    private readonly UIPlayerInputViewContainer rightViewContainer;
    //string 대신 int값을 전달하도록 미리 해시값을 가져다놓습니다.
    //생각해보니까 이건 Model에 들어가야 했을 것 같네요.
    private readonly int activeHash = Animator.StringToHash("Active");

    public UIPlayerInputPresenter(
      Model model,
      UIPlayerInputViewContainer leftViewContainer,
      IPlayerMoveSubscriber leftSubscriber, //IPlayerMoveSubscriber: 새로 추가한 인터페이스
      UIPlayerInputViewContainer rightViewContainer,
      IPlayerMoveSubscriber rightSubscriber)//플레이어 이동 인풋의 Performed,
    {										//Cancled에 이벤트를 넣을 수 있게 했습니다.
      this.model = model;
      this.leftViewContainer = leftViewContainer;
      this.rightViewContainer = rightViewContainer;

		//left 플레이어의 이동 InputAction Performed에 이벤트를 등록
      leftSubscriber.SubscribeOnPerformed(direction=>
      {	//여기서 direction은 Up,Left,Down,Right로 구성된 Enum입니다.
        var view = direction switch
        {	//방향에 따라서 View Animator의
          Direction.Up => leftViewContainer.upView,
          Direction.Down => leftViewContainer.downView,
          Direction.Left => leftViewContainer.leftView,
          Direction.Right => leftViewContainer.rightView,
          _=>throw new System.NotImplementedException(),
        };	//Bool 값을 변경해 애니메이션이 실행되도록 합니다.
        view.SetBool(activeHash, true);
      });
      //버튼을 땠을 때는 원래도록 돌아와야 하니
      leftSubscriber.SubscribeOnCanceled(direction =>
      {
        var view = direction switch
        {
          Direction.Up => leftViewContainer.upView,
          Direction.Down => leftViewContainer.downView,
          Direction.Left => leftViewContainer.leftView,
          Direction.Right => leftViewContainer.rightView,
          _ => throw new System.NotImplementedException(),
        };
        view.SetBool(activeHash, false);	//Canceled에도 실행되도록 등록해줍니다.
      });
      //right에도 비슷하게 적용
      rightSubscriber.SubscribeOnPerformed(direction =>
      {
        var view = direction switch
        {
          Direction.Up => rightViewContainer.upView,
          Direction.Down => rightViewContainer.downView,
          Direction.Left => rightViewContainer.leftView,
          Direction.Right => rightViewContainer.rightView,
          _ => throw new System.NotImplementedException(),
        };
        view.SetBool(activeHash, true);
      });
      rightSubscriber.SubscribeOnCanceled(direction =>
      {
        var view = direction switch
        {
          Direction.Up => rightViewContainer.upView,
          Direction.Down => rightViewContainer.downView,
          Direction.Left => rightViewContainer.leftView,
          Direction.Right => rightViewContainer.rightView,
          _ => throw new System.NotImplementedException(),
        };
        view.SetBool(activeHash, false);
      });
    }

    public UniTask ShowAsync(bool isImmediately = false, CancellationToken token = default)
    {
      return UniTask.CompletedTask;
    }

    public UniTask HideAsync(bool isImmediately = false, CancellationToken token = default)
    {
      return UniTask.CompletedTask;
    }

    public IDisposable AttachOnDestroy(GameObject target)
      => target.OnDestroyAsObservable().Subscribe(_ => Dispose());

    public UIVisibleState GetVisibleState()
    {
      return UIVisibleState.Showed;
    }

    public void SetVisibleState(UIVisibleState visibleState)
    {
      throw new NotImplementedException();
    }

    public void Dispose()
    {
      IUIPresenterContainer container = GlobalManager.instance.UIManager;
      container.Remove(this);
    }
  }
플레이어 Presenter에 이벤트 구독용 인터페이스를 추가하기도 했습니다.
public interface IPlayerMoveSubscriber
{
  public void SubscribeOnPerformed(UnityAction<Direction> performed);

  public void SubscribeOnCanceled(UnityAction<Direction> canceled);

  public void UnsubscribePerfoemd(UnityAction<Direction> perfoemd);

  public void UnsubscribeCanceled(UnityAction<Direction> canceled);
}
public interface IPlayerPresenter: IPlayerMoveController, IPlayerMoveSubscriber, IStageObjectController
public class BasePlayerPresenter : IPlayerPresenter
{
//생략
private UnityEvent<Direction> onPerformed = new();
private UnityEvent<Direction> onCanceled = new();
//중략: 대충 플레이어 InputAction의 로직 부분
switch (context.phase)
{
case InputActionPhase.Started:
break;
case InputActionPhase.Performed:
view.AddDirection(vectorDirection);
onPerformed?.Invoke(direction);
break;
case InputActionPhase.Canceled:
view.RemoveDirection(vectorDirection);
onCanceled?.Invoke(direction);
break;
}
}InputAction의 context.phase Performed/Canceled 부분마다 해당 이벤트를 발동합니다.
현재 실질적으로 Phase 사용 부분이 Performed랑 Canceled뿐이니 이 둘만 만들었습니다.
    private async UniTask CreateInputUIPresenterAsync()
    {
      var model = new UIPlayerInputPresenter.Model();
      var leftView = viewContainer.leftViewContainer;
      var leftSubscriber = await LocalManager.instance.StageManager.GetPresenterAsync(PlayerType.Left);
      var rightView = viewContainer.rightViewContainer;
      var rightSubscriber = await LocalManager.instance.StageManager.GetPresenterAsync(PlayerType.Right);
      IUIPresenterFactory presenterFactory = GlobalManager.instance.UIManager;
      presenterFactory.Register(() => new UIPlayerInputPresenter(model, leftView, leftSubscriber, rightView, rightSubscriber));
      inputUIPresenter = presenterFactory.Create<UIPlayerInputPresenter>();
      inputUIPresenter.AttachOnDestroy(viewContainer.gameObject);
    }
마음에 안 드는 점은, IPlayerMoveSubscriber를 가져오는 과정에서 참조가 좀 쌥니다.
UIManager 산하에서 이루어지는 일이다보니 외부에서 Player를 가져와야 하는데, 타 싱글톤에서 가져오는 방법밖에 떠오르지가 않네요.
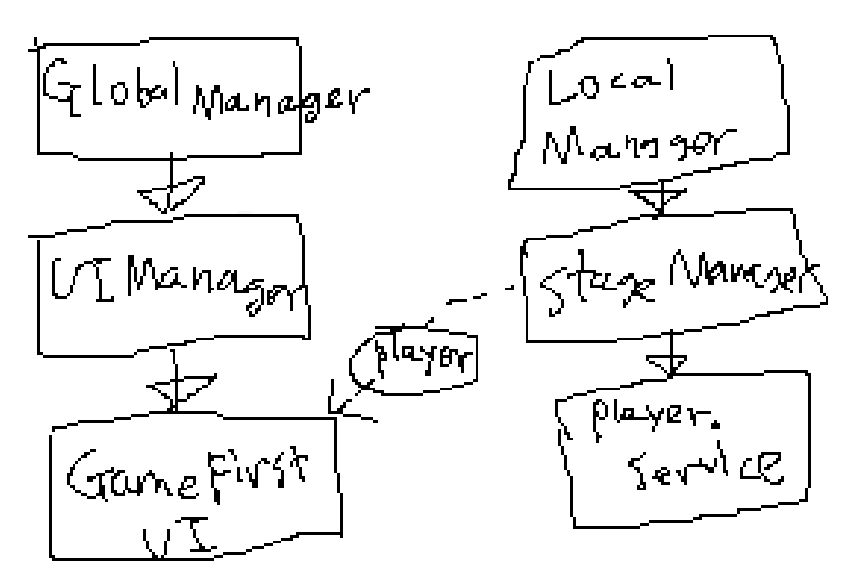
UI쪽은 DontDestroyGameObject가 달린 GlobalManager,
오브젝트 쪽은 씬마다 고유한 LocalManager에서 담당하고 있습니다.
그래서 UI 쪽에서 플레이어 관련 코드를 가져오려면 LocalManager.instance.StageManager 등을 참조해야 했는데 아무래도 이것보단 더 좋은 방법이 있지 않을까 싶네요.
다음 목표: 외부 반응으로 플레이어 오브젝트 움직이기(바운스같은거)
'무제_LR' 카테고리의 다른 글
| 피격 후 무적 시간 적용 (0) | 2025.11.22 |
|---|---|
| 플레이어에 FSM 적용에 FSM 적용 (0) | 2025.11.21 |
| ScriptableObject는 항상 동일한 인스턴스가 아니다?!?!?!?!?!?!?!?!?!?!?!? (0) | 2025.11.13 |
| ScriptableObject로 전역 이벤트 써먹기 (0) | 2025.11.12 |
| 간단한 Localization 및 언어별 Font 설정 (0) | 2025.11.11 |